Introduction
Your CIBIL report plays an important role when you apply for a loan or credit card. But sometimes, it may contain incorrect information such as a wrong loan account, payment status, outstanding balance, personal details, or duplicate account.
If you find an error in your CIBIL report, you can raise a CIBIL dispute online and request the information to be reviewed and corrected. In this guide, we’ll show you the complete CIBIL dispute process step by step, with screenshots of each stage to make it easy to follow.
How to Raise a Dispute on CIBIL: Step-by-Step Process
Step 1: Log in to Your CIBIL Account
Login to Your CIBIL Account ↗First, visit the official CIBIL website and log in using your registered username and password.
Enter your registered username and password, then click on the Login button.
After logging in, you may be asked to verify your identity using an OTP sent to your registered mobile number.
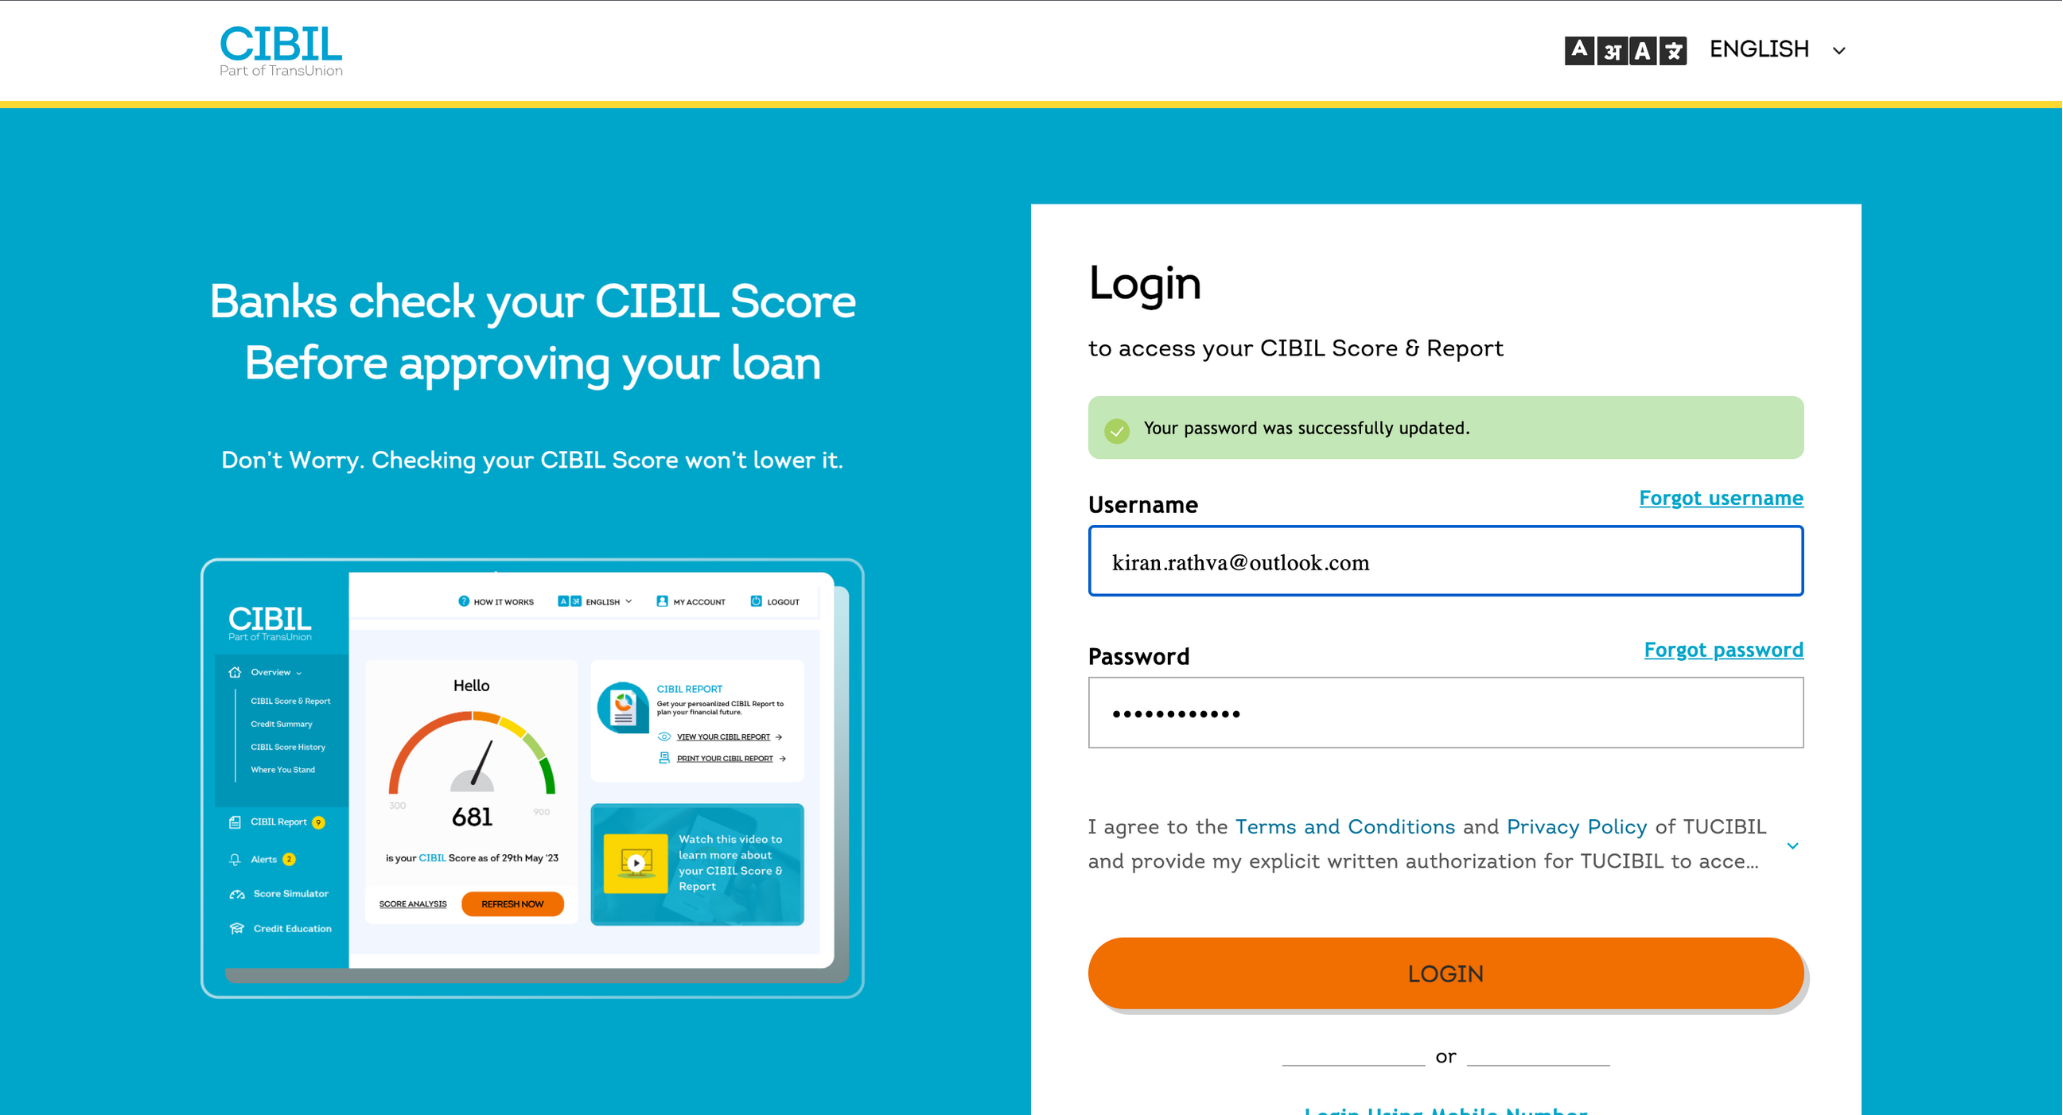
Use the same registered email ID or mobile number associated with your CIBIL account. If you have forgotten your login credentials, use the Forgot Username or Forgot Password option available on the login page.
Step 2: Verify Your Identity with OTP
After entering your username and password and clicking Login, CIBIL will ask you to verify your identity.
An OTP (One-Time Password) will be sent to your registered mobile number. Enter the OTP in the required boxes and click Continue to access your CIBIL account.
If you do not receive the OTP, click on Resend OTP to request a new one.
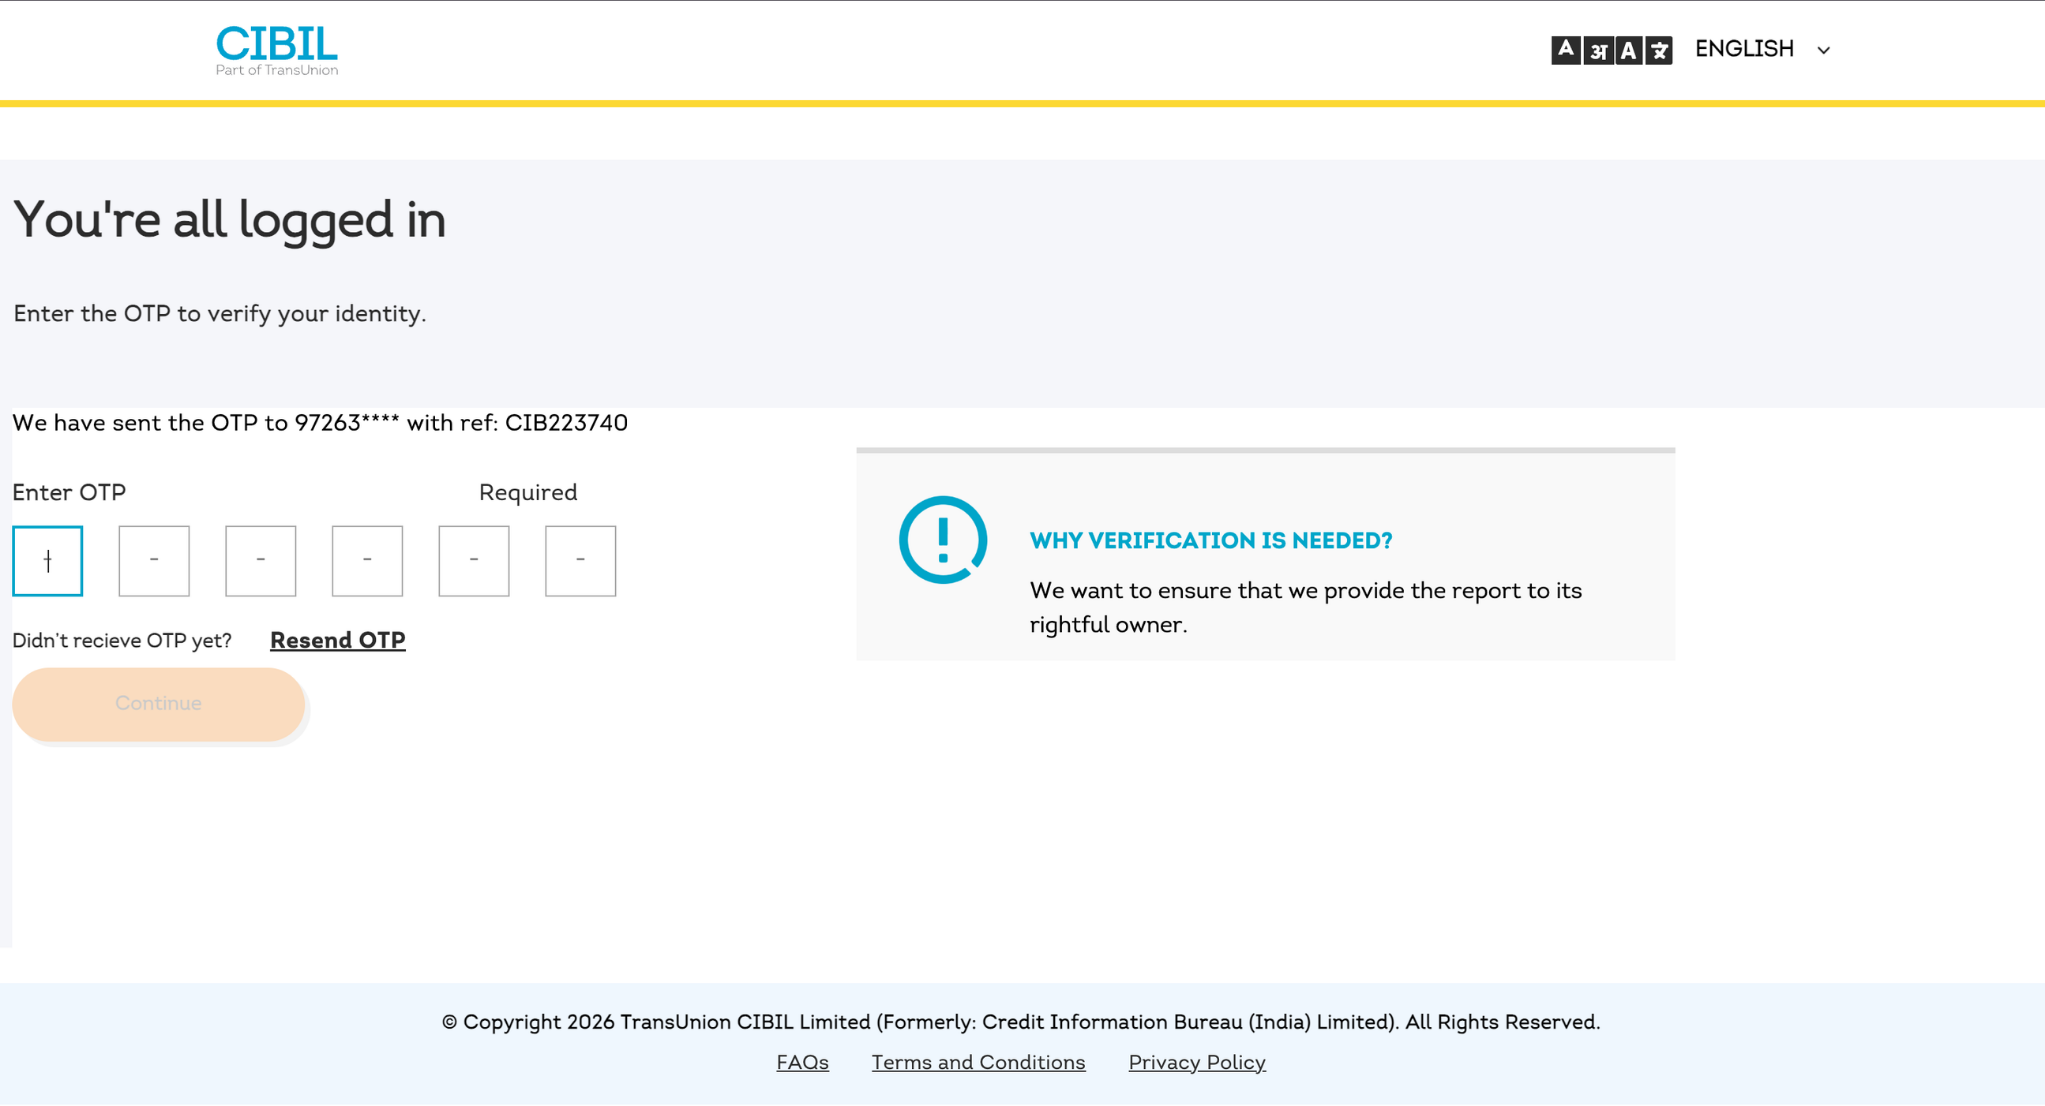
Make sure you have access to the mobile number registered with your CIBIL account. If the registered mobile number is no longer active, you may need to update your details before completing the verification process.
Step 3: Open Your CIBIL Report
After successfully verifying the OTP, you will be logged in to your CIBIL account dashboard.
From the menu on the left-hand side, click on CIBIL Report. This will open your complete credit report,where you can review your loan accounts, credit cards, repayment history, enquiries, and other credit-related information.
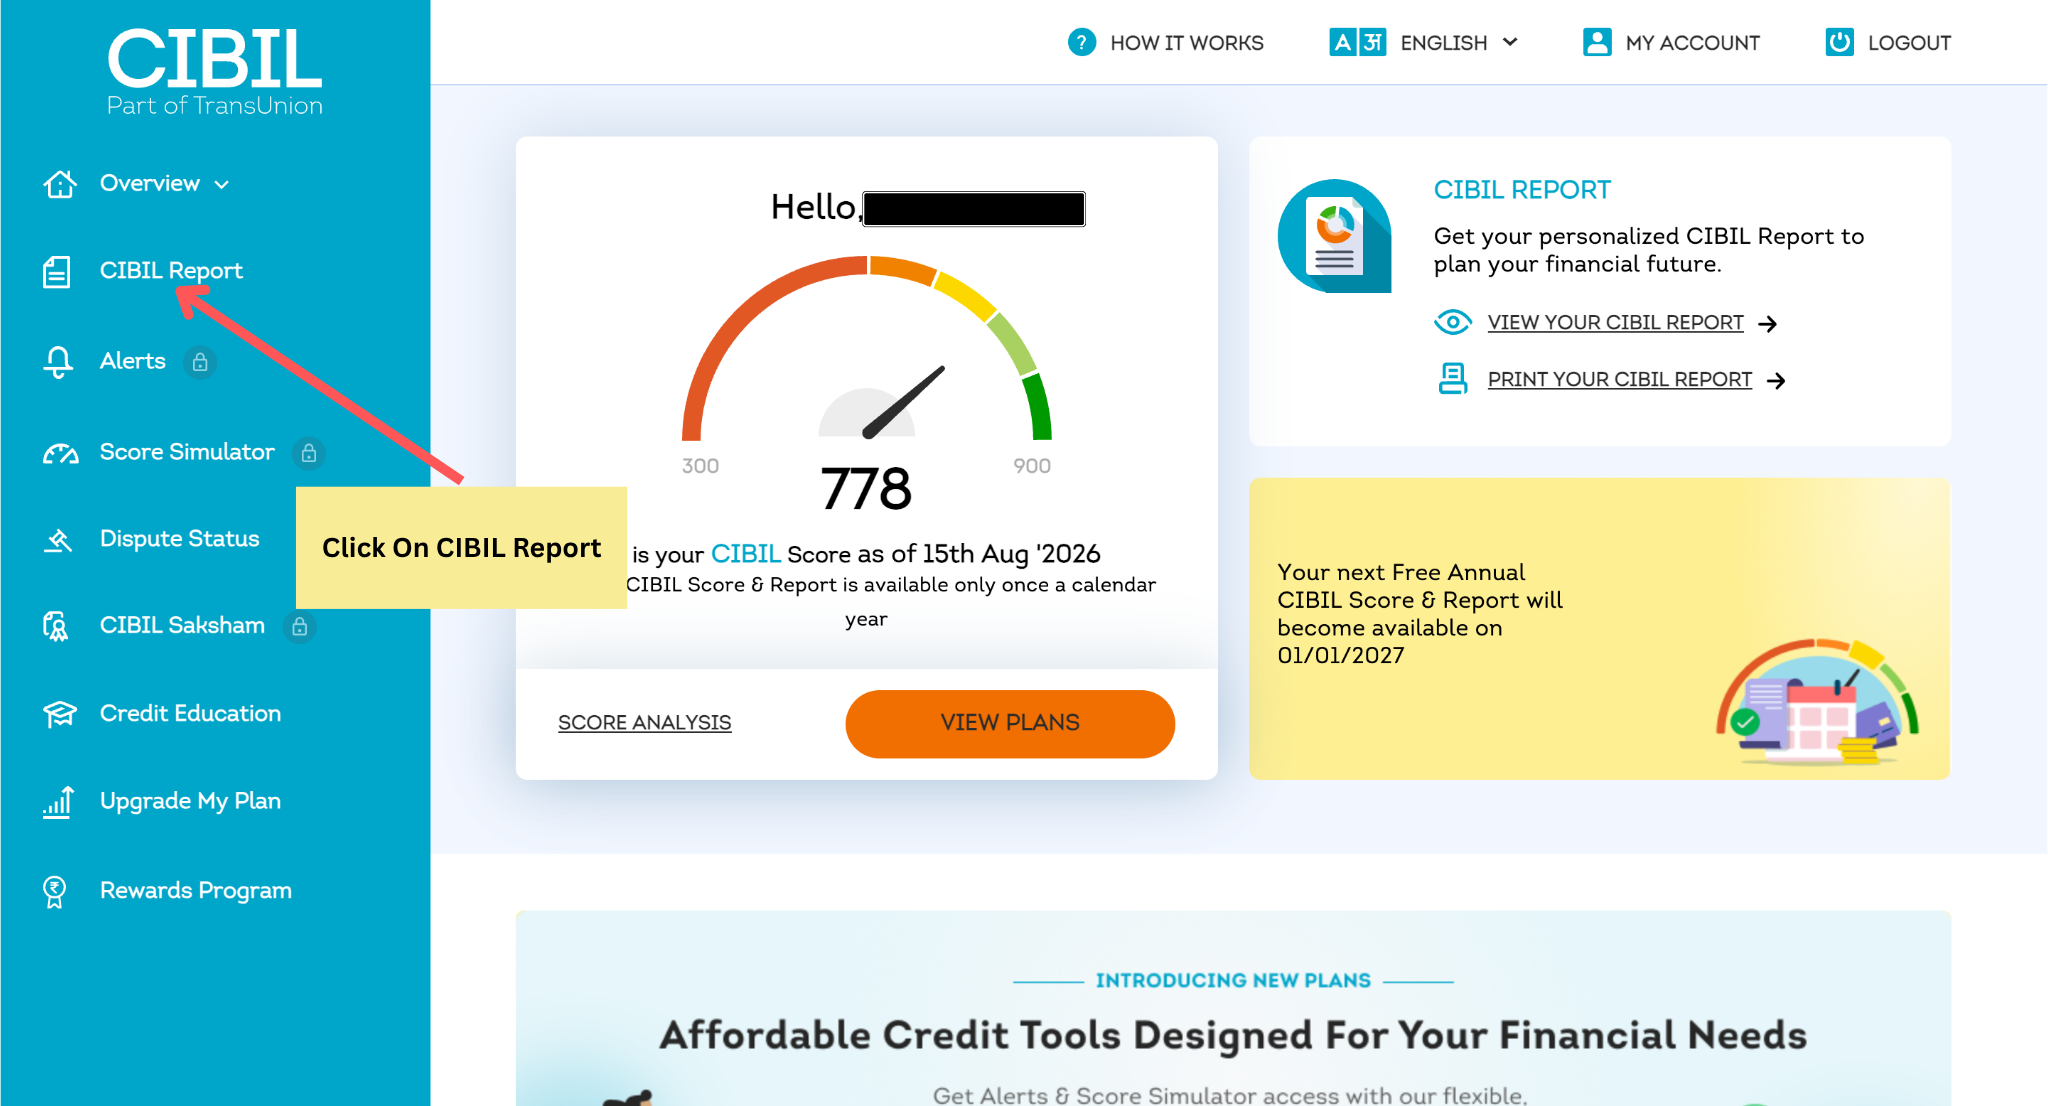
Before raising a dispute, carefully review your complete CIBIL Report and identify the exact information that appears incorrect. This will help you select the correct account and dispute category in the next steps.
Step 4: Scroll Down and Click “Raise a Dispute”
After opening your CIBIL Report, scroll down to the bottom of the page. You will find the “Raise a Dispute” option in the footer section.
Click on “Raise a Dispute” to start the dispute process and report any incorrect information in your CIBIL report.
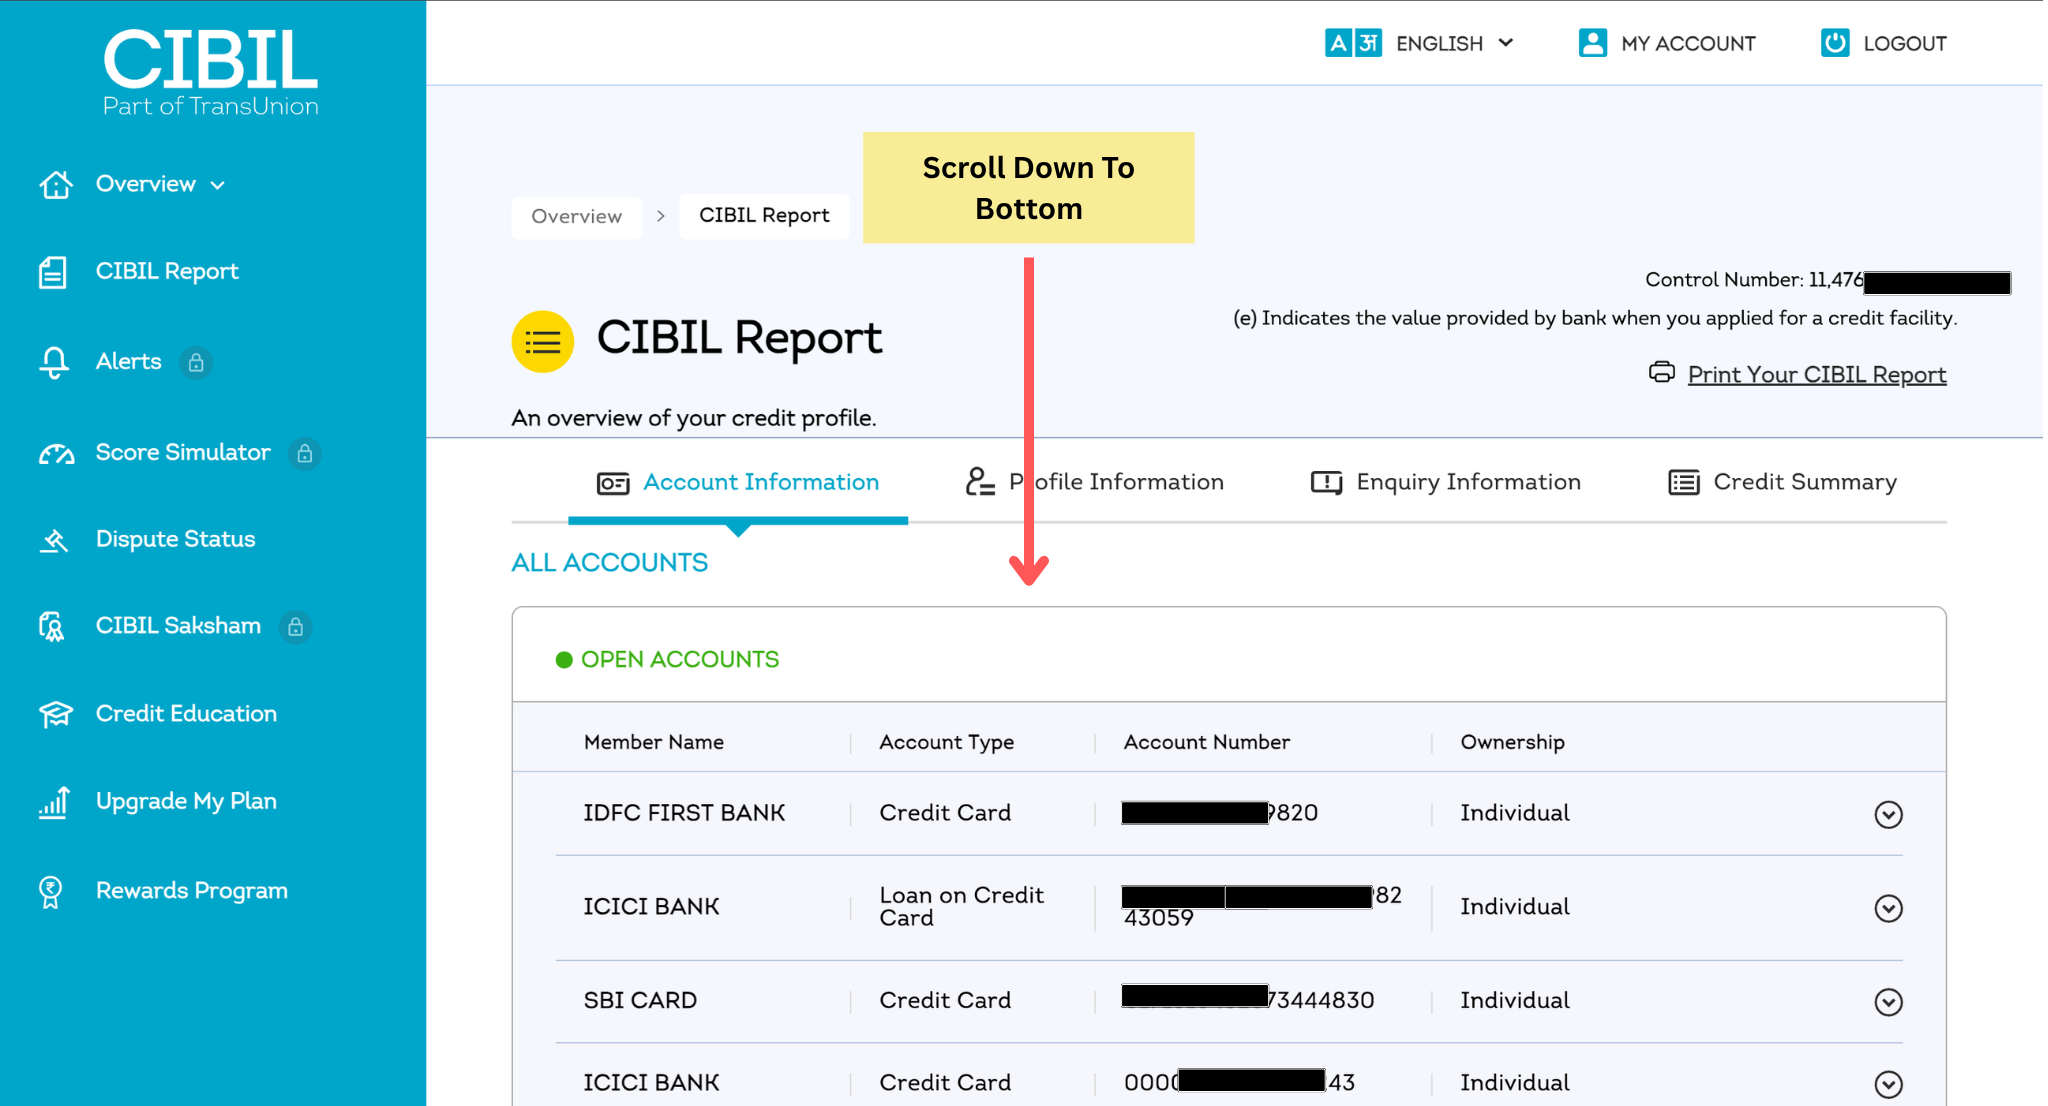
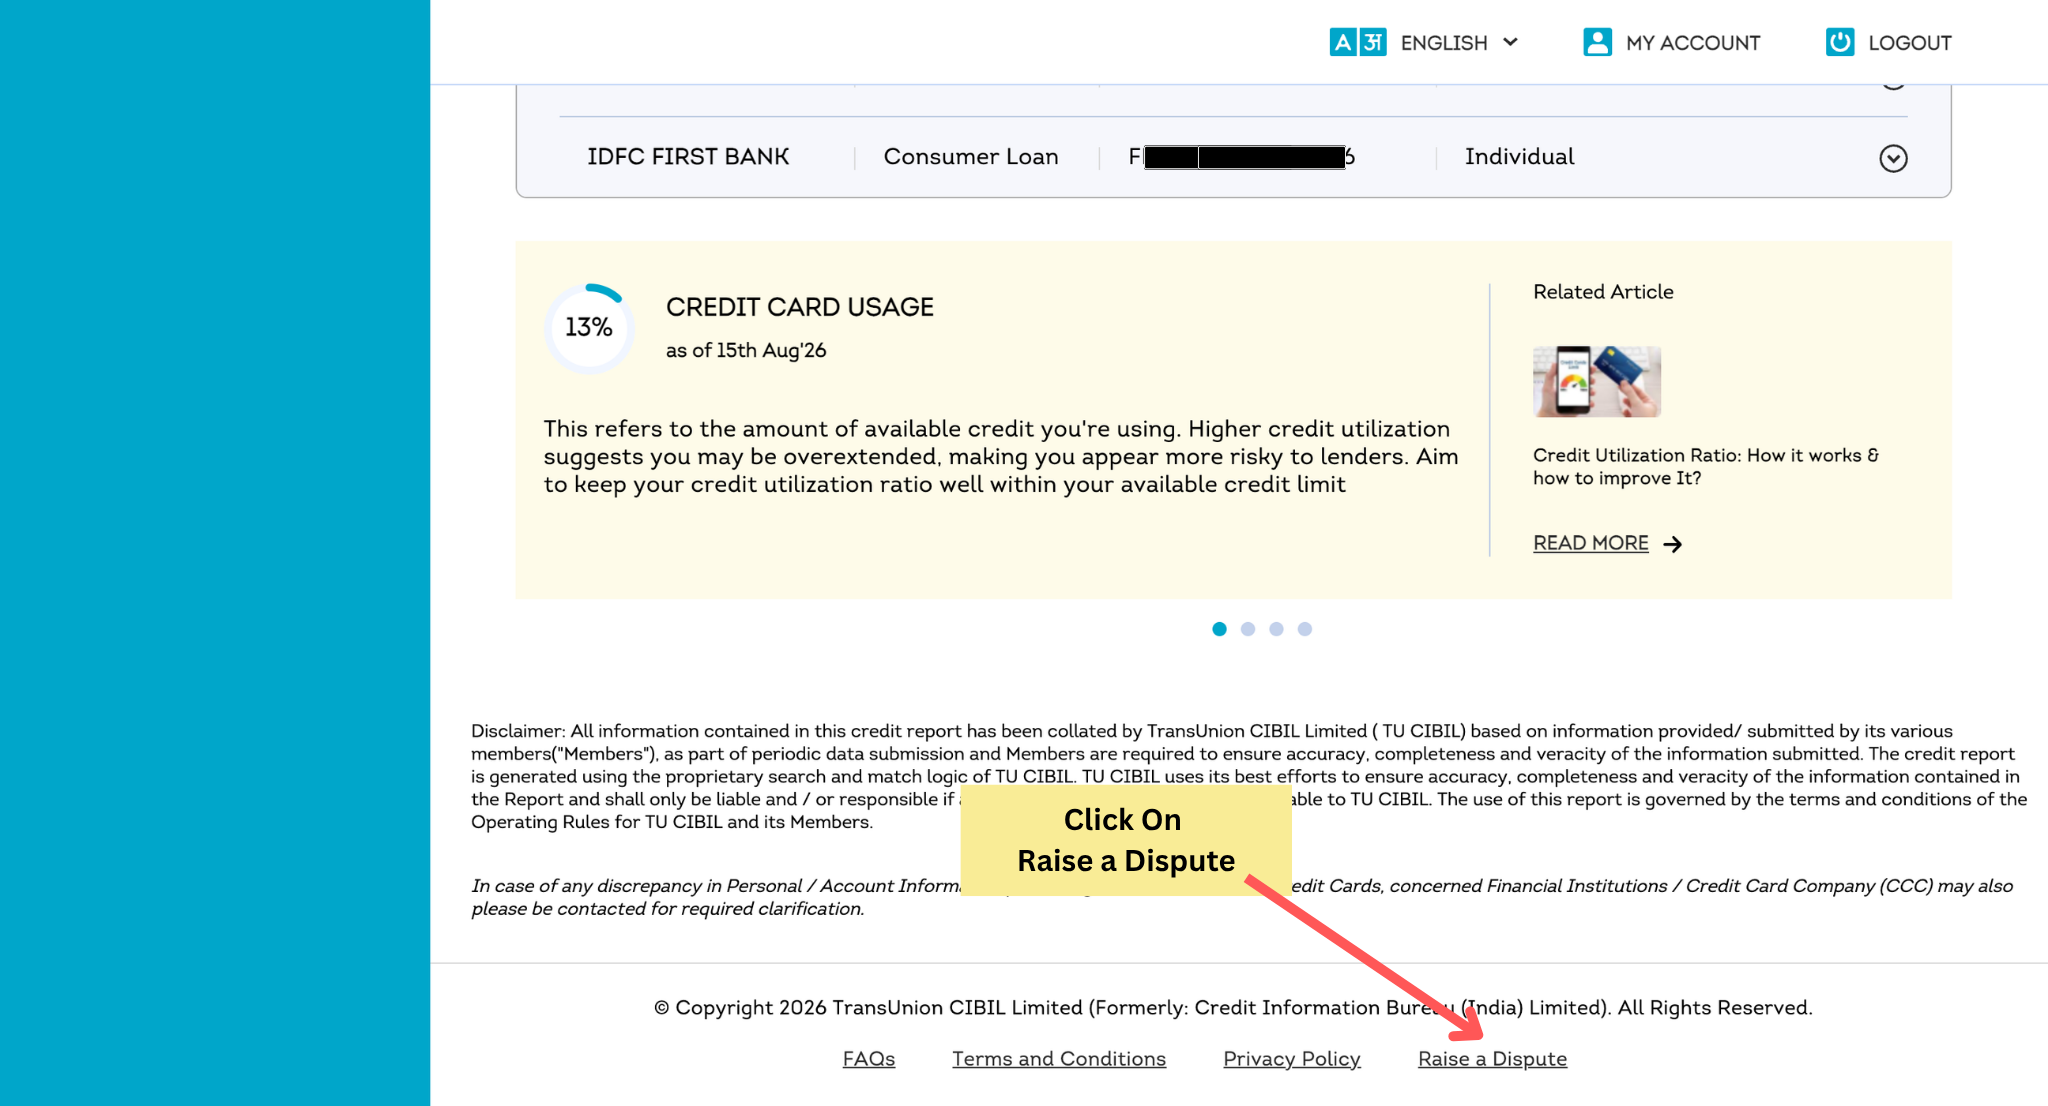
Before raising a dispute, carefully check your CIBIL report and identify the incorrect account, payment, balance, overdue amount, or personal information you want to dispute.
Step 5: Choose the Part of Your CIBIL Report You Want to Dispute
After clicking “Raise a Dispute”, you will be asked to choose which section of your CIBIL report contains the incorrect information.
You may see options such as:
For errors related to your loan or credit card, click “Account Section” to continue.
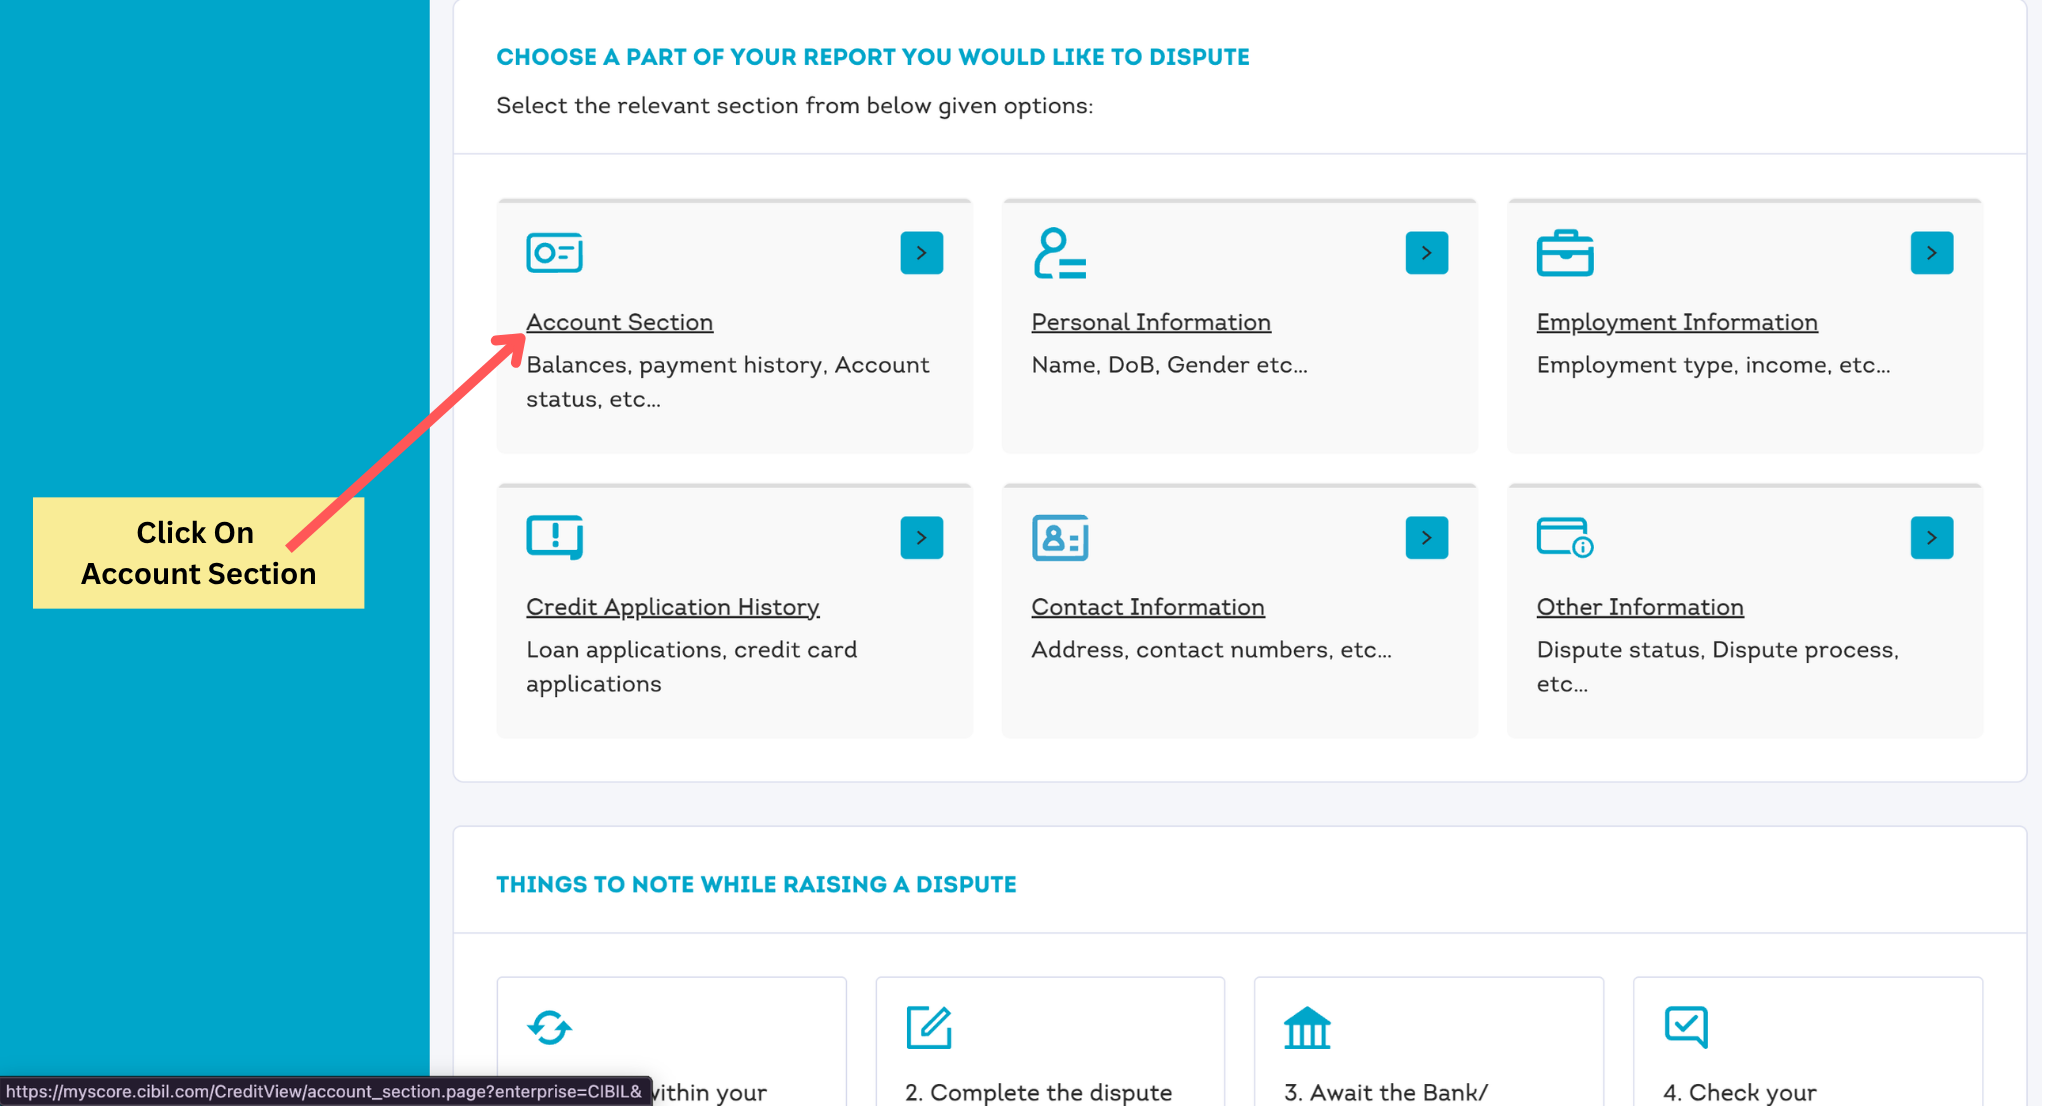
Choose the section carefully based on the information you want to correct. For incorrect loan, credit card, EMI, payment, overdue, or account status details, select Account Section.
Step 6: Find Your Issue and Click “Raise a Dispute”
After selecting the relevant issue from the Account Section, scroll down to read the available information and instructions related to that issue.
Once you reach the bottom of the page, you will see the “Raise a Dispute” button.
Click “Raise a Dispute” to proceed to the dispute form and submit your request for correction.
What to do:
1. Select the issue that matches your problem.
2. Scroll down and review the information provided by CIBIL.
3. At the bottom of the page, click “Raise a Dispute.”
4. Continue to the dispute form and provide the required details.
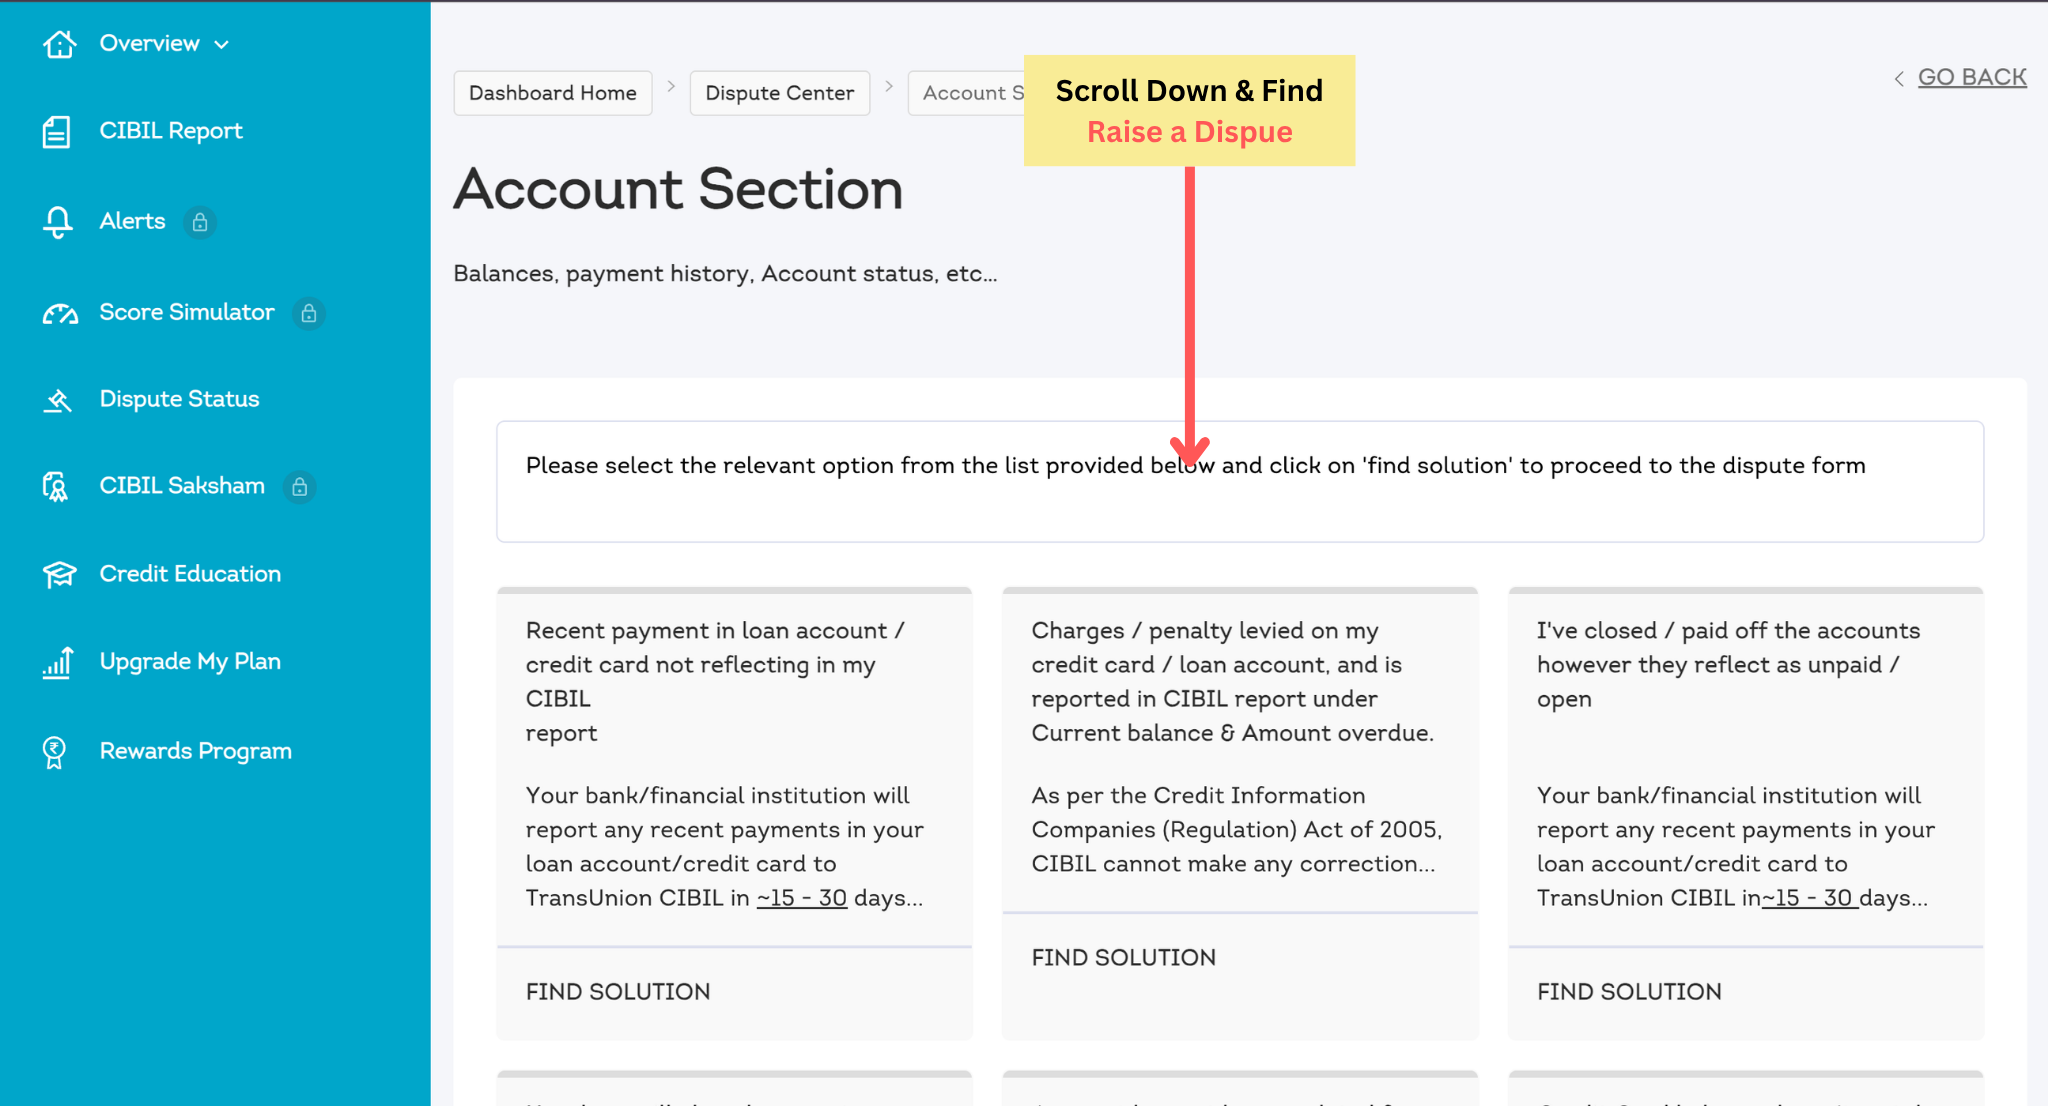
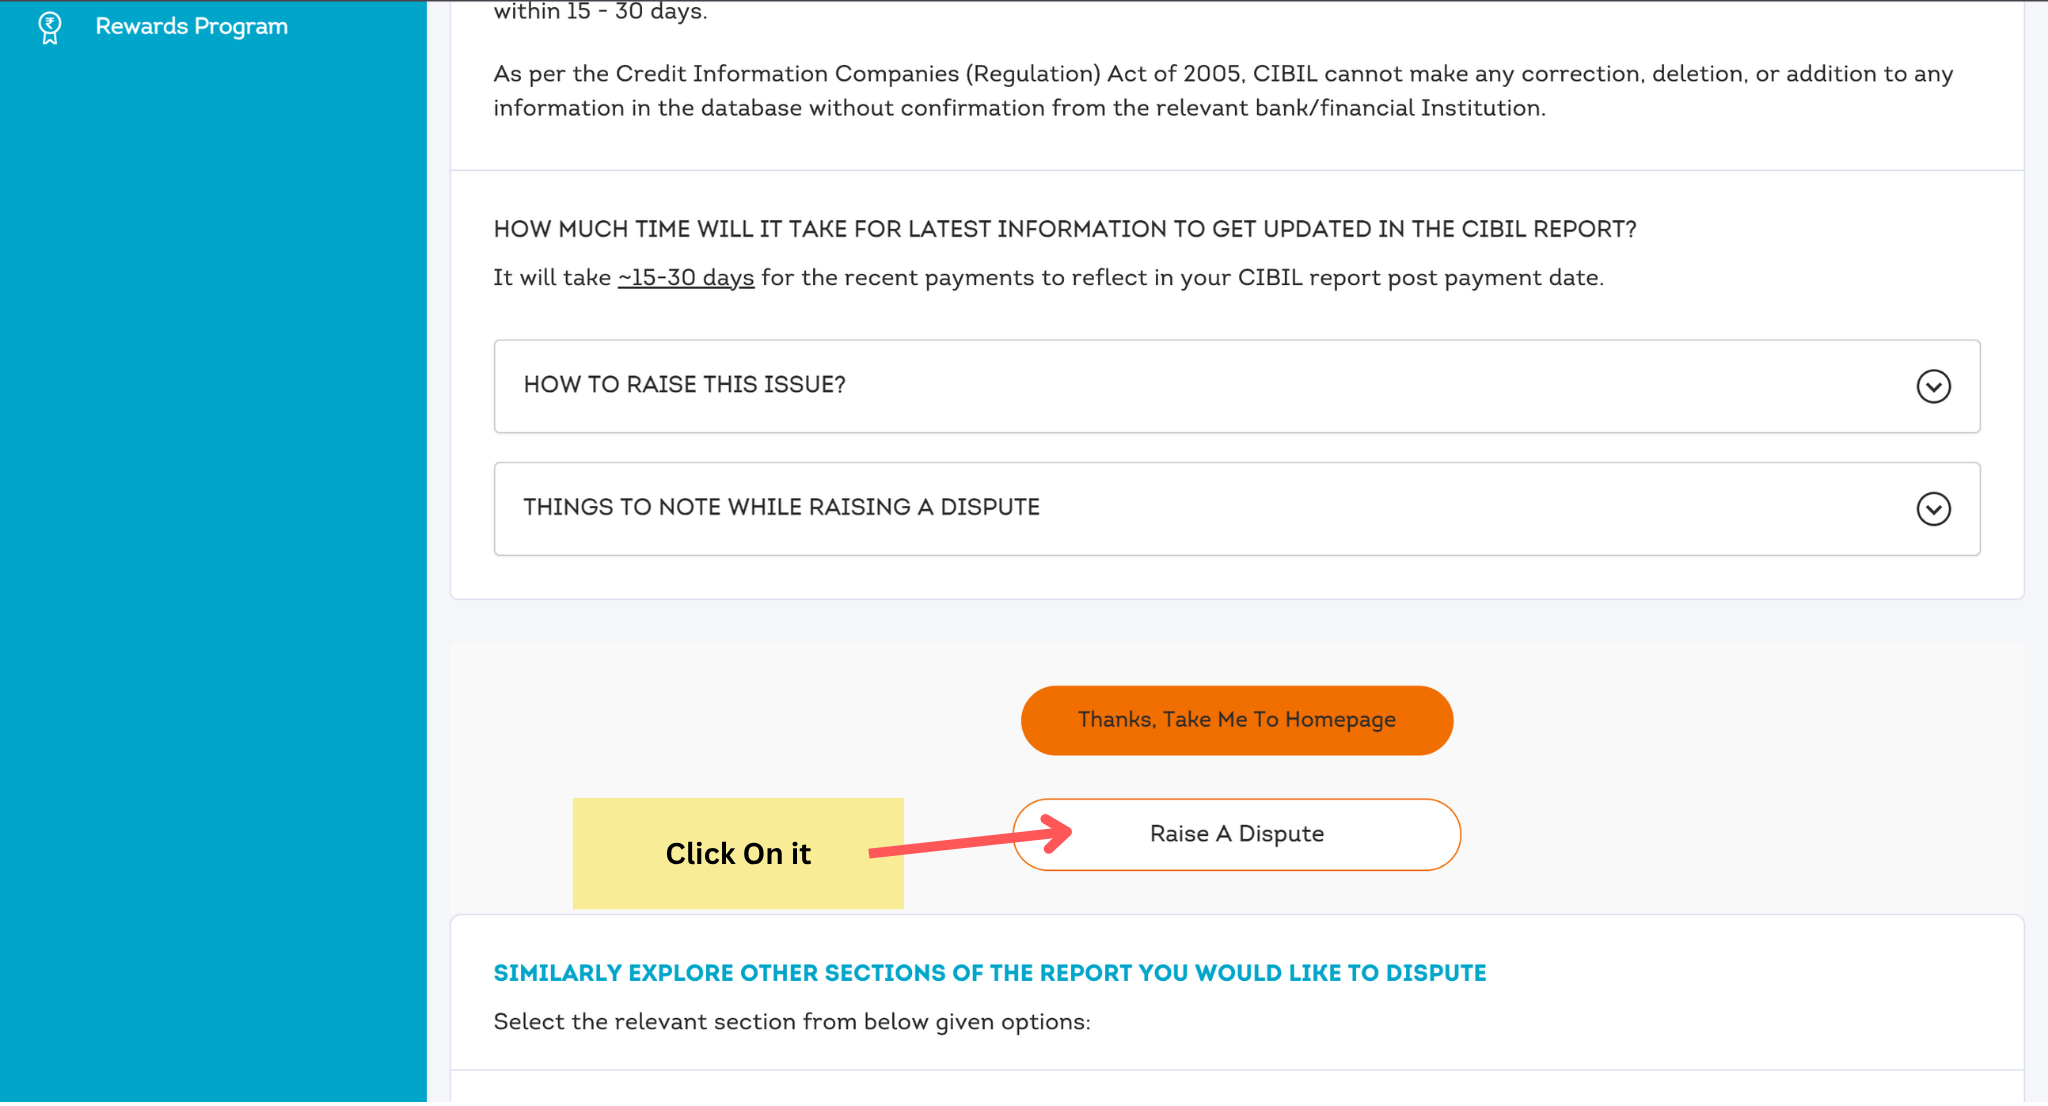
Before clicking “Raise a Dispute,” make sure you have selected the correct issue related to your loan or credit card account. Choosing the most relevant dispute reason can help ensure your request is sent for the appropriate review.
Step 7: Select the Account and Submit Your Dispute
1. Select the account you want to dispute and click the arrow icon to expand the account details.
2. Review the account information and identify the incorrect detail you want to dispute.
3. After selecting the required dispute option, scroll down and click Continue.
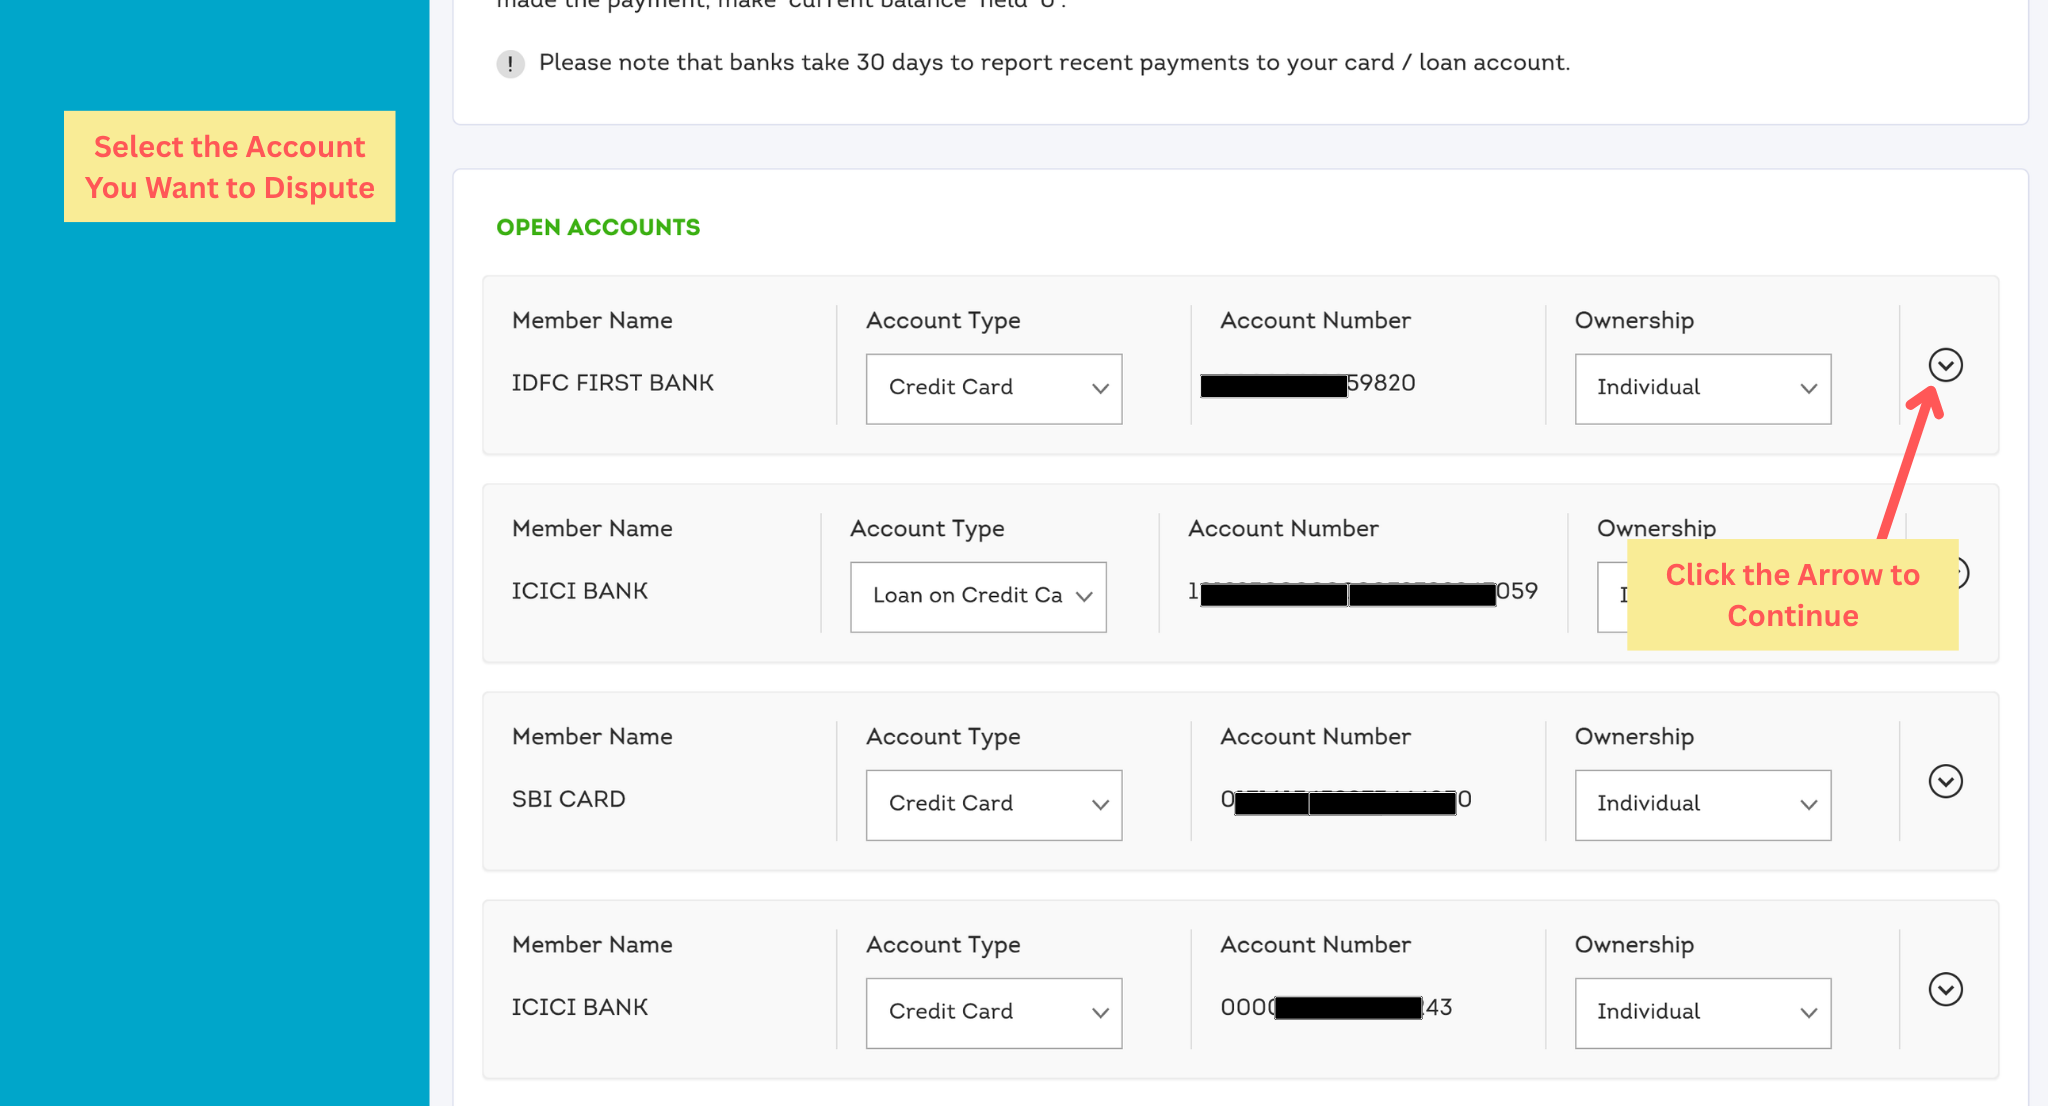
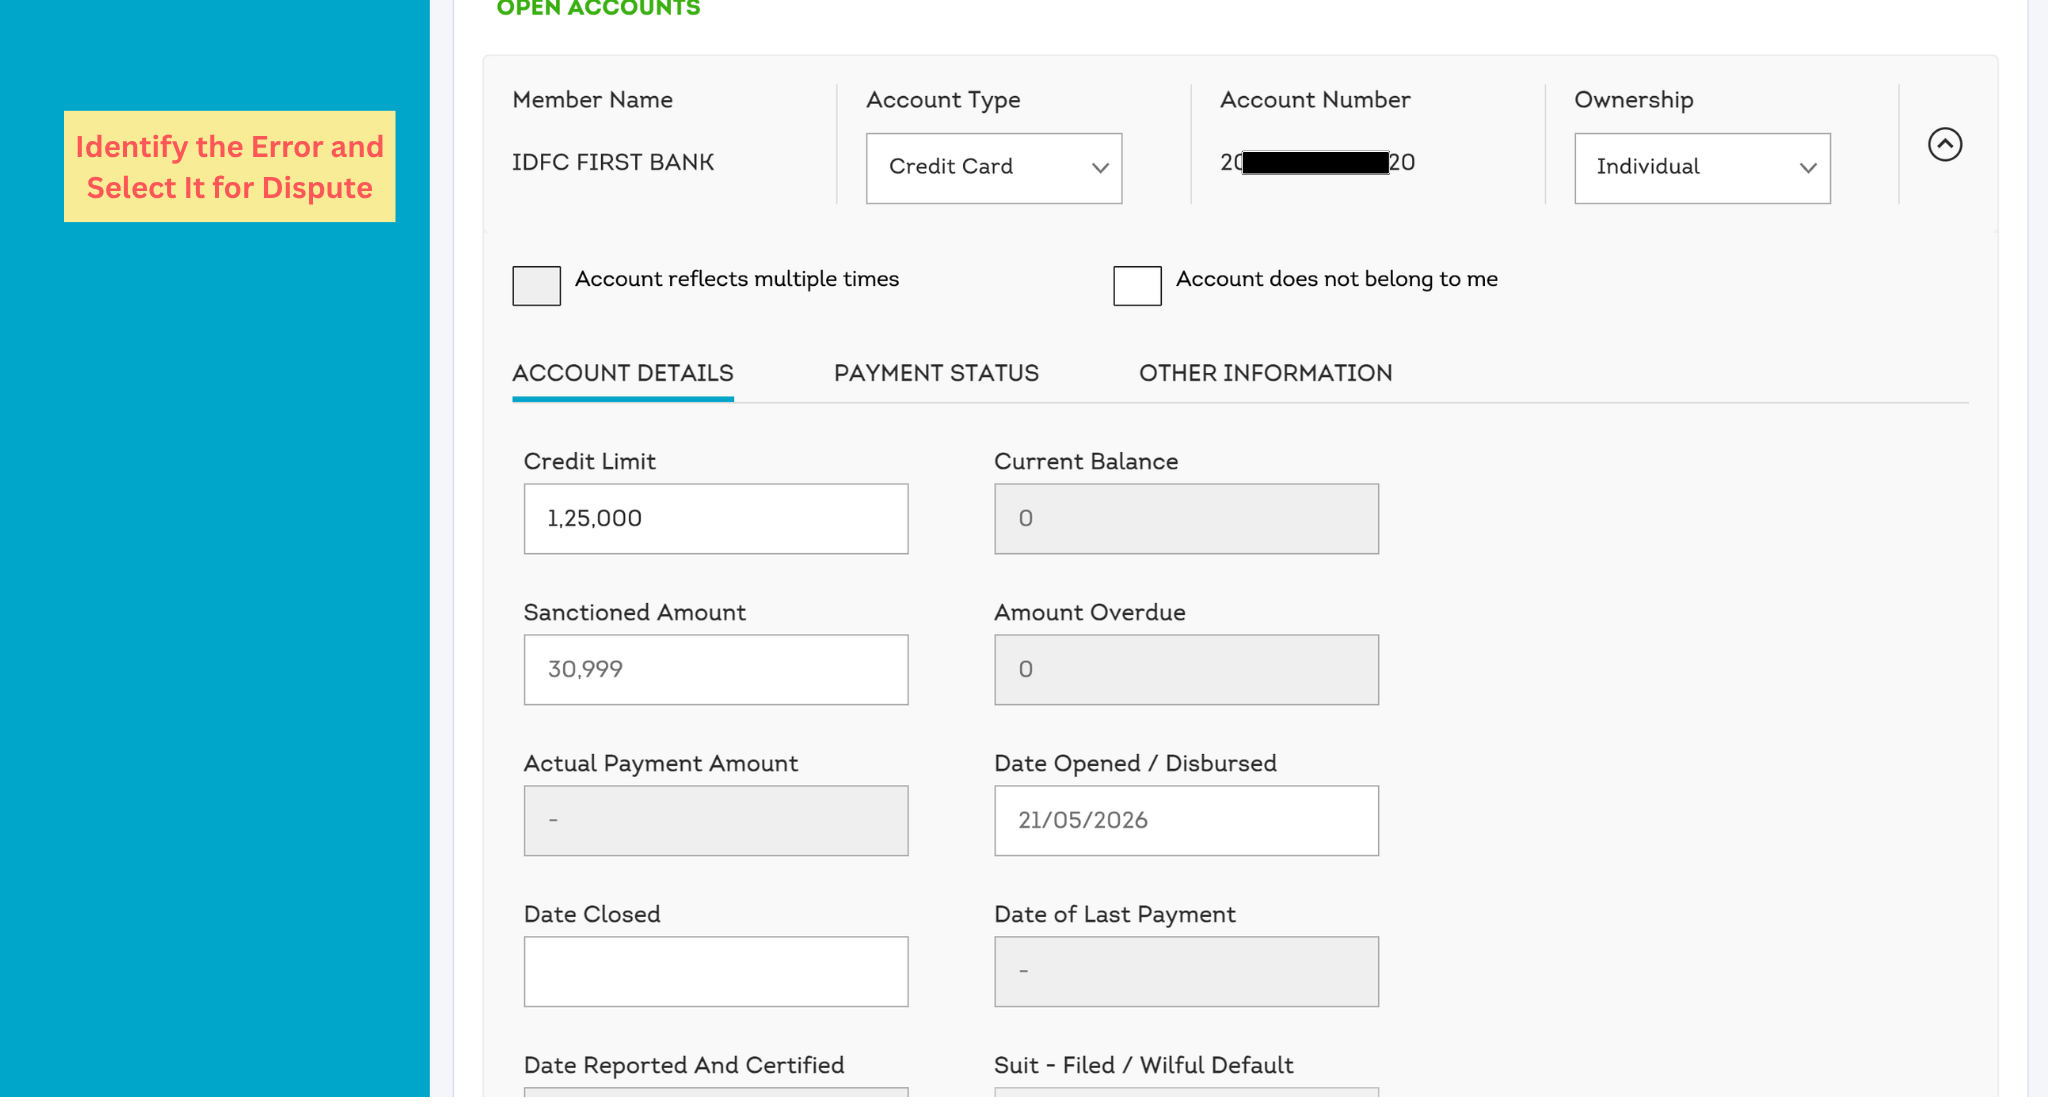
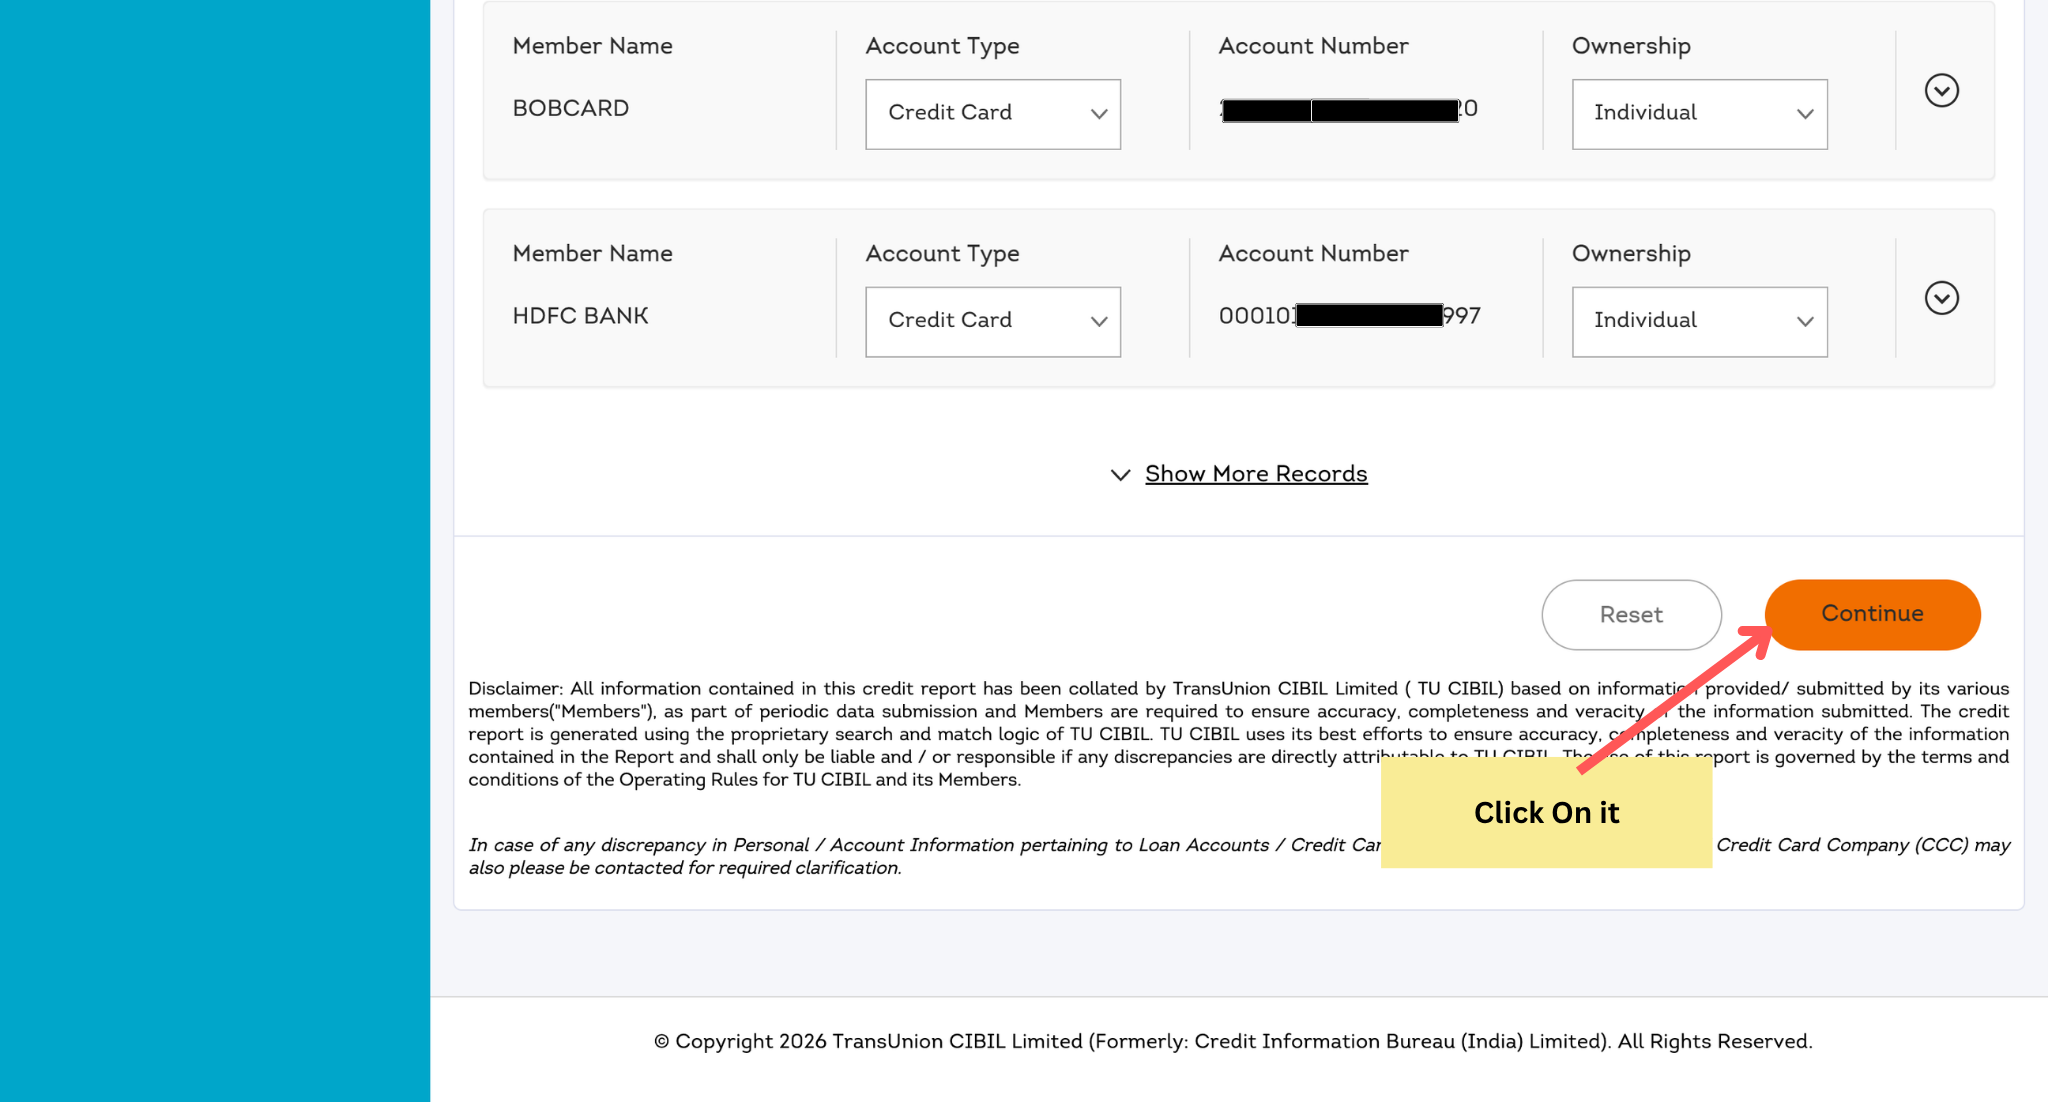
Important: Do not select multiple accounts unless the same issue appears in each account. Raise the dispute only for the account and information that is incorrect.
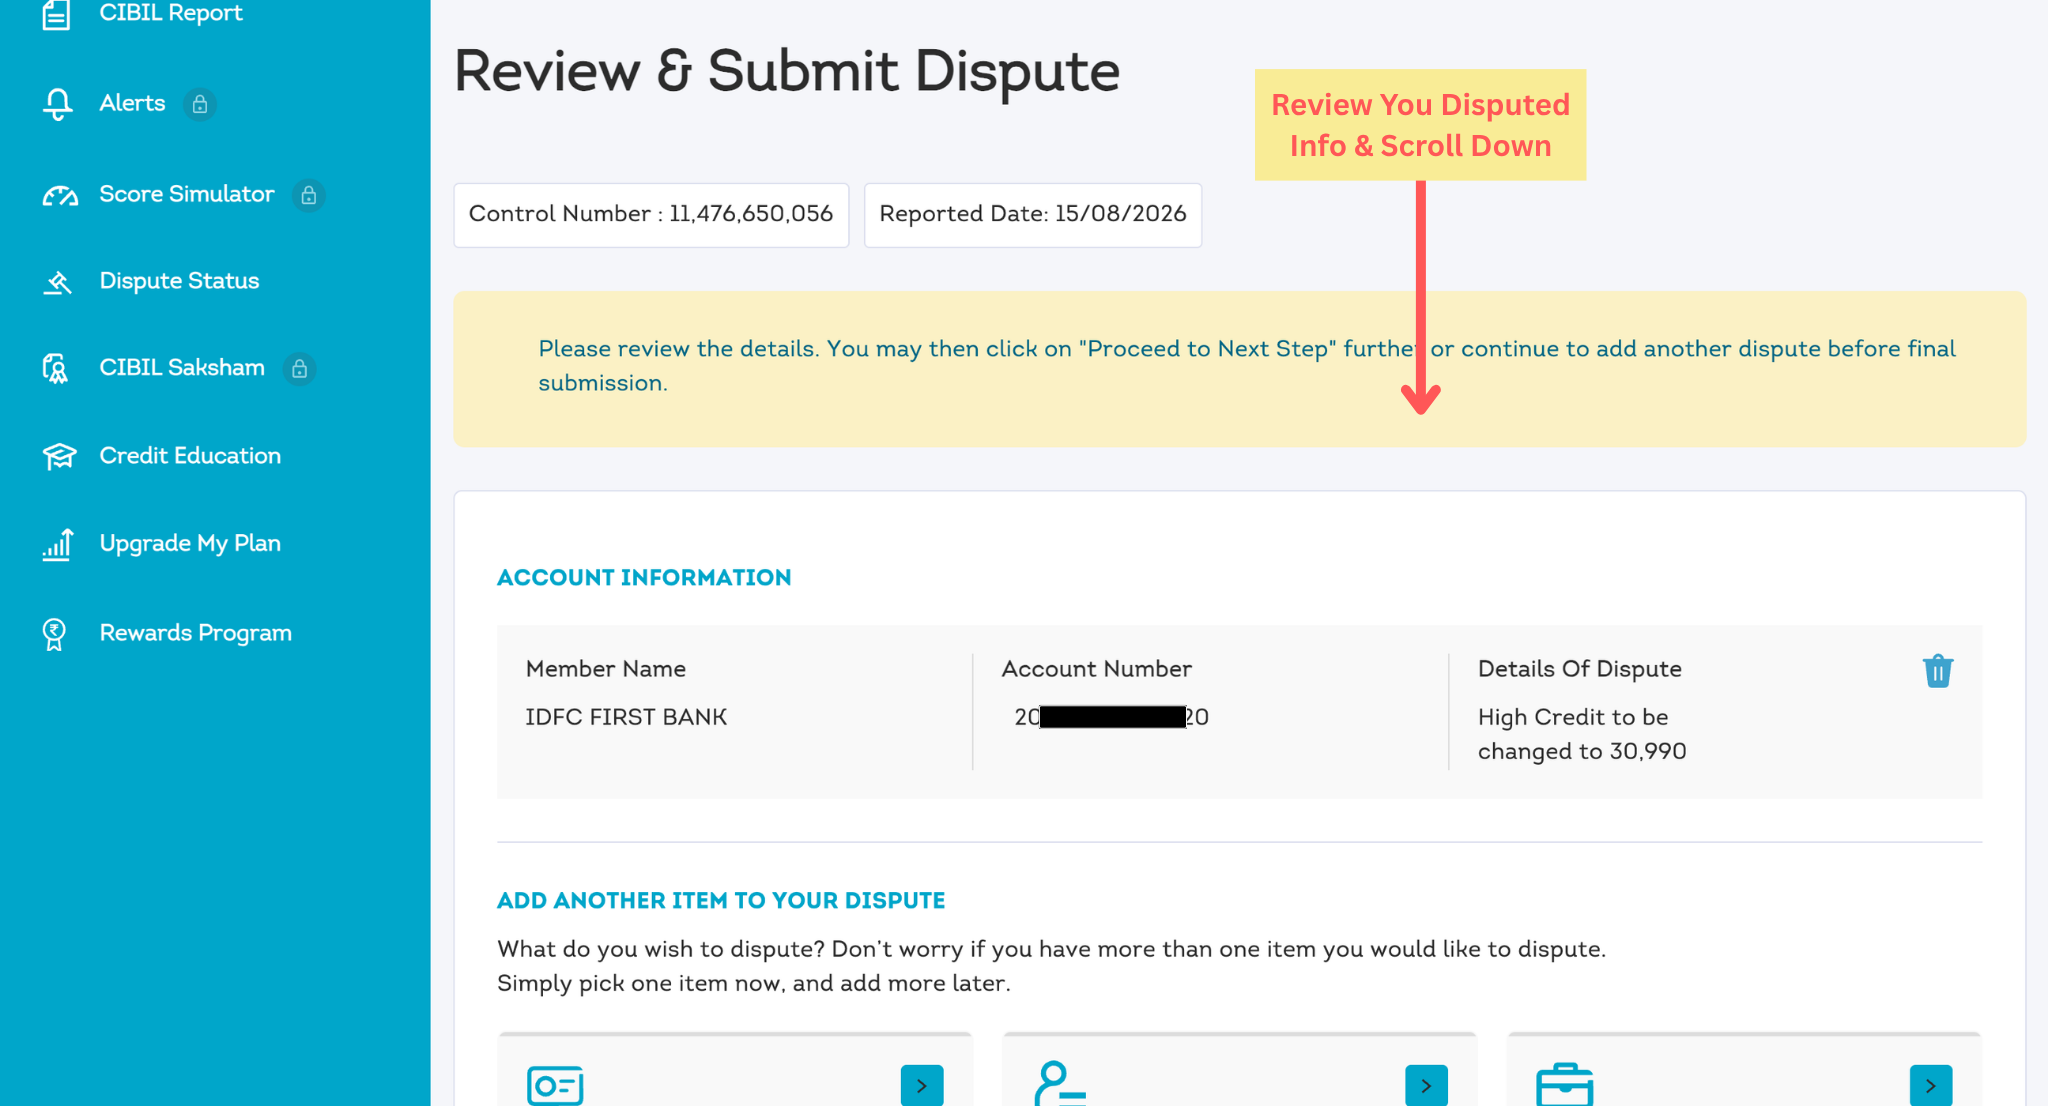
Step 8: Review and Submit Your Dispute
1. Review your disputed information carefully to make sure the selected account and dispute details are correct.
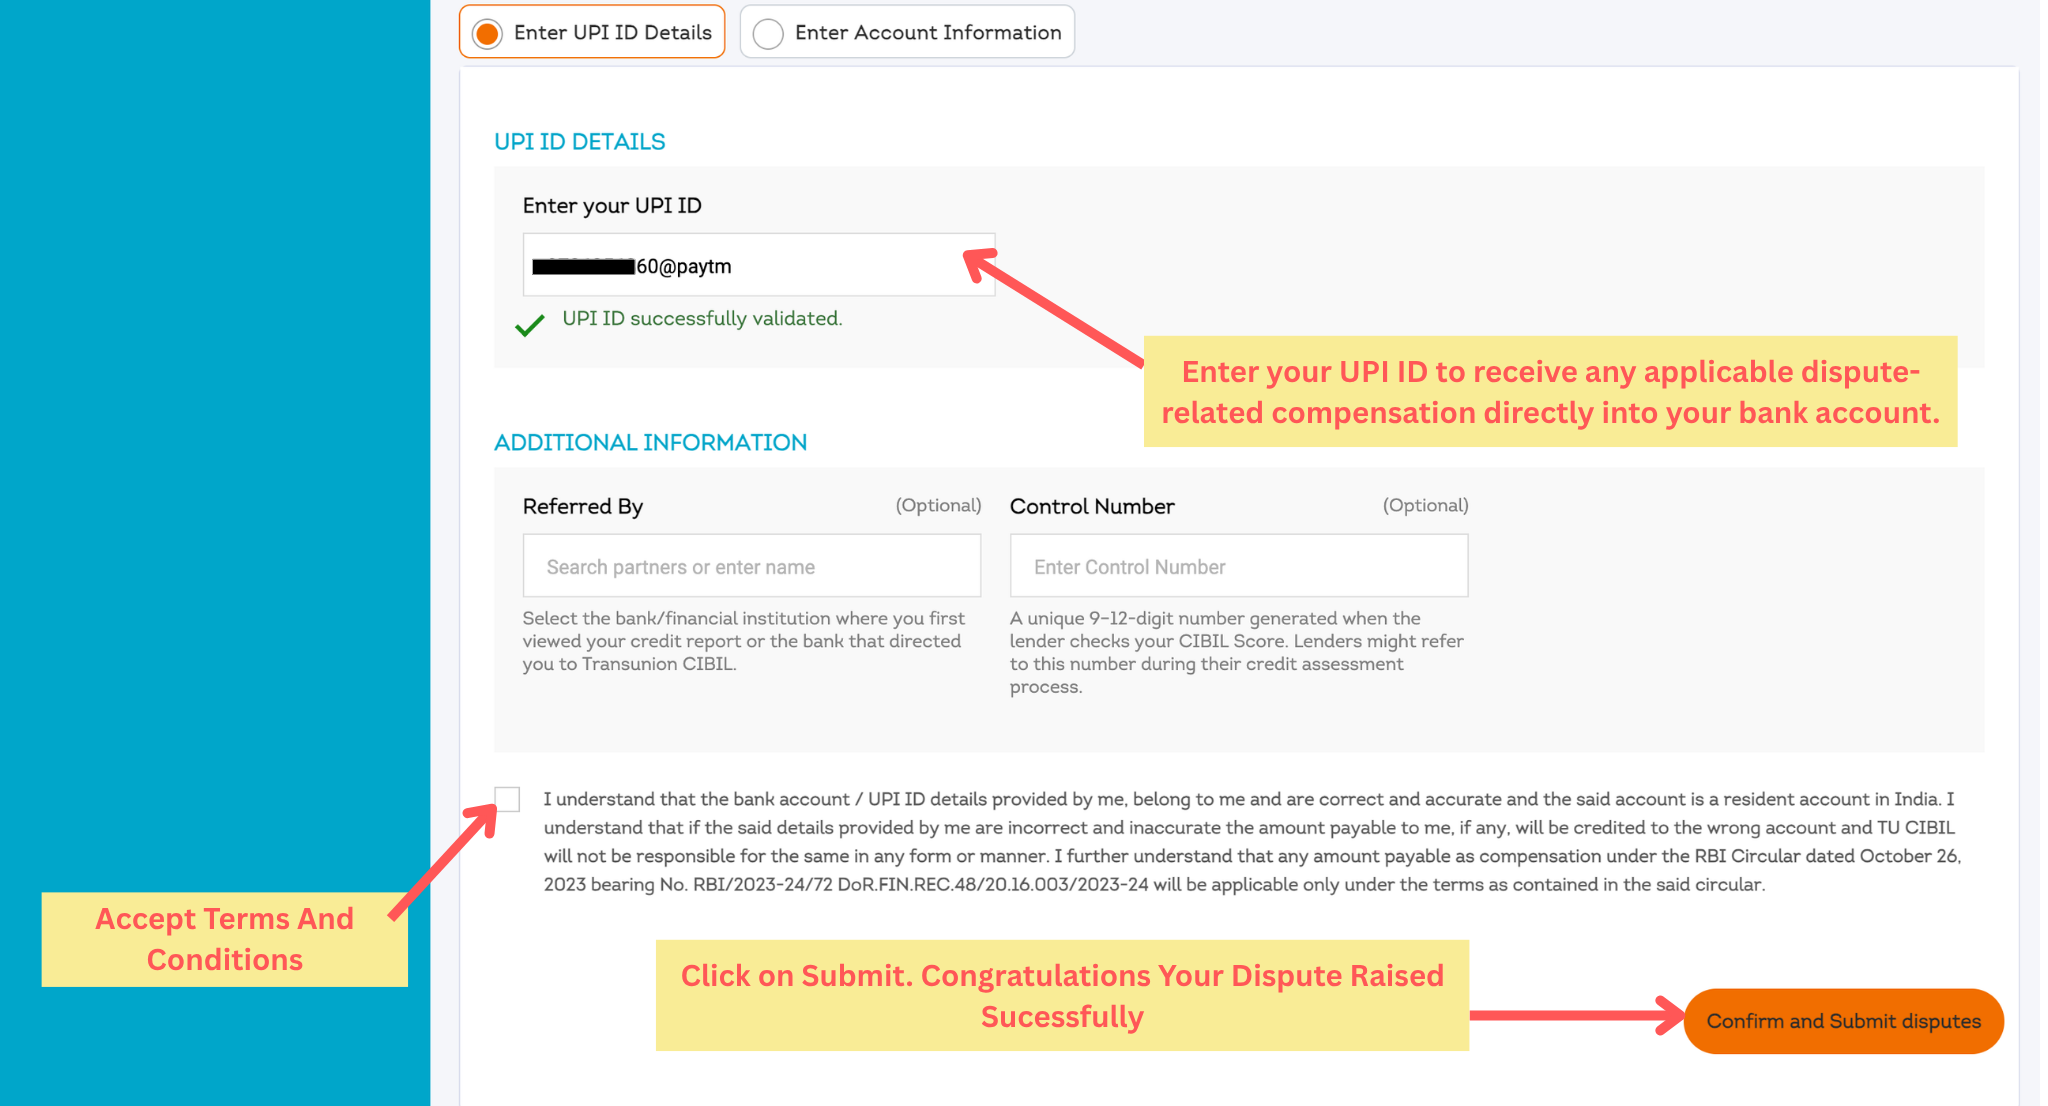
2. If applicable, enter your UPI ID details for any dispute-related compensation.
3. Read and accept the Terms and Conditions by ticking the checkbox.
4. Finally, click “Confirm and Submit disputes” to submit your request.
Enter your UPI ID carefully, as it may be used to receive any applicable dispute-related compensation or payment directly to your linked bank account. Make sure the UPI ID belongs to you and is entered correctly.
Final Thoughts
Raising a dispute for incorrect information in your CIBIL report can help ensure that your credit profile accurately reflects your financial history. Follow the steps carefully, select the correct account or information, and review all details before submitting your dispute.
Once your dispute is submitted, keep track of the Control Number and check your CIBIL report again after the issue is resolved or updated.
Need Help Understanding Your CIBIL Report?
If you are facing issues with your credit score, incorrect loan or credit card information, payment history, or multiple loans and credit cards, TechFinserv can help you understand your financial situation and explore suitable loan options.
Paying Too Many EMIs Every Month?
Let's Explore Smarter Repayment Options
If you're managing multiple loan EMIs, loan app repayments, or credit card outstanding balances, start with a quick profile review and understand what options may be available.